使 GPT 以软件公司的形式工作,协作处理更复杂的任务
MetaGPT一行要求作为输入,输出用户故事 / 竞品分析 / 需求 / 数据结构 / APIs / 文件等
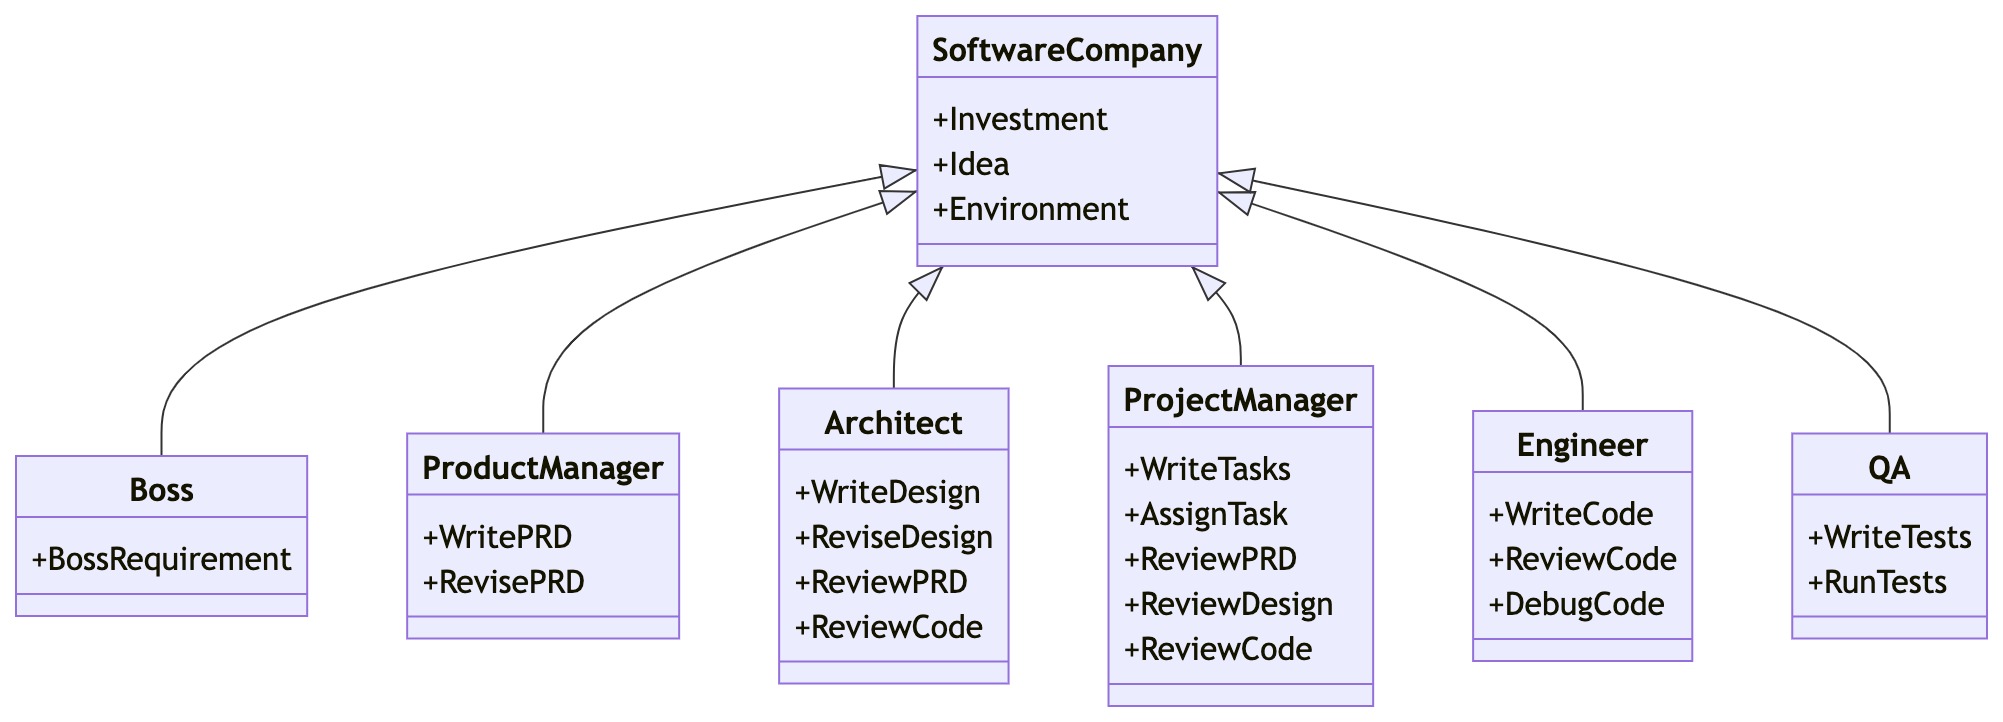
MetaGPT内部包括产品经理 / 架构师 / 项目经理 / 工程师,它提供了一个软件公司的全过程与精心调配的SOP
Code = SOP(Team)是核心哲学。将SOP具象化,并且用于LLM构成的团队
快速开始
安装稳定版本
pip install metagpt
以开发模式安装
根据自己的独特需求定制框架、尝试新的想法或者利用框架创建复杂功能(如新颖的记忆机制)的开发者和研究者。
git clone https://github.com/geekan/MetaGPT.git
cd /your/path/to/MetaGPT
pip install -e .
安装子模块
- RAG,
pip install 'metagpt[rag]'. 用途:用于基于 RAG(Retrieval-Augmented Generation,检索增强生成)的系统,结合多个 LLM(大语言模型)和向量存储技术。 - OCR,
pip install 'metagpt[ocr]'. 用途:用于光学字符识别(OCR)任务,识别和提取图像中的文本。 - search-ddg,
pip install 'metagpt[search-ddg]'. 用途:用于 DuckDuckGo 搜索功能。 - search-google,
pip install 'metagpt[search-google]'. 用途:用于与 Google API(如 Google 搜索 API)进行交互。 - selenium,
pip install 'metagpt[selenium]'. 用途:用于自动化浏览器操作和网页抓取。
配置大模型API
OpenAI API
其他大模型的API配置过程是相同的。可以通过设置 config2.yaml 完成配置
使用config2.yaml
- 在当前工作目录中创建一个名为
config的文件夹,并在其中添加一个名为config2.yaml的新文件。 - 将示例config2.yaml文件的内容复制到新文件中。
- 将自己的值填入文件中:
llm:
  api_type: 'openai' # or azure / ollama / groq etc. Check LLMType for more options
  api_key: 'sk-...' # YOUR_API_KEY
  model: 'gpt-4-turbo' # or gpt-3.5-turbo
  # base_url: 'https://api.openai.com/v1'  # or any forward url.
  # proxy: 'YOUR_LLM_PROXY_IF_NEEDED'  # Optional. If you want to use a proxy, set it here.
  # pricing_plan: 'YOUR_PRICING_PLAN' # Optional. If your pricing plan uses a different name than the `model`.
注意: MetaGPT将按照以下优先顺序读取:
~/.metagpt/config2.yaml > config/config2.yaml
一句话需求的软件开发
首先,导入已实现的角色
import asyncio
from metagpt.roles import (
    Architect,
    Engineer,
    ProductManager,
    ProjectManager,
)
from metagpt.team import Team
然后,初始化公司团队,配置对应的智能体,设置对应的预算以及提供一个写一个小游戏的需求。
async def startup(idea: str):
    company = Team()
    company.hire(
        [
            ProductManager(),
            Architect(),
            ProjectManager(),
            Engineer(),
        ]
    )
    company.invest(investment=3.0)
    company.run_project(idea=idea)

    await company.run(n_round=5)
最后,运行并得到生成的游戏代码!
await startup(idea="write a cli blackjack game") # blackjack: 二十一点
具有单一动作的智能体
假设我们想用自然语言编写代码,并想让一个智能体为我们做这件事。让我们称这个智能体为 SimpleCoder,我们需要两个步骤来让它工作:
- 定义一个编写代码的动作
- 为智能体配备这个动作
定义动作
在 MetaGPT 中,类 Action 是动作的逻辑抽象。用户可以通过简单地调用 self._aask 函数令 LLM 赋予这个动作能力,即这个函数将在底层调用 LLM api。
定义了一个 SimpleWriteCode 子类 Action。虽然它主要是一个围绕提示和 LLM 调用的包装器,但这个 Action 抽象更直观。在下游和高级任务中,使用它作为一个整体感觉更自然,而不是分别制作提示和调用 LLM,尤其是在智能体的框架内。
from metagpt.actions import Action # 导入 Action 基类
import re

class SimpleWriteCode(Action):

    PROMPT_TEMPLATE: str = """
    Write a python function that can {instruction} and provide two runnnable test cases.
    Return ```python your_code_here ``` with NO other texts,
    your code:
    """
    # 这是一个类属性,定义了发送给LLM的提示模板。
    # {instruction} 是一个占位符,将在运行时被实际的用户指令替换。
    # 模板明确要求LLM返回一个以 "```python" 开头,以 "```" 结尾的代码块,并且不要包含其他文本。
    # 这种严格的格式要求是为了方便后续的解析。

    name: str = "SimpleWriteCode"

    async def run(self, instruction: str):
        # 这是一个异步方法,是执行动作的核心逻辑。
        # 接收一个字符串参数 `instruction`,即用户对代码的需求描述。

        prompt = self.PROMPT_TEMPLATE.format(instruction=instruction)
        # 使用用户的 `instruction` 填充 `PROMPT_TEMPLATE`,生成完整的LLM提示。
        # 例如,如果 instruction 是 "calculates the sum of a list",
        # 那么 prompt 会变成 "Write a python function that can calculates the sum of a list and provide two runnnable test cases.\nReturn ```python your_code_here ``` with NO other texts,\nyour code:"

        rsp = await self._aask(prompt)
        code_text = SimpleWriteCode.parse_code(rsp)
        # 调用类方法 `parse_code` 来从LLM的原始响应 `rsp` 中提取出纯净的Python代码。
        # 这一步非常关键,因为LLM的响应可能包含额外的解释性文本、markdown格式等。

        return code_text

    @staticmethod
    def parse_code(rsp):

        pattern = r"```python(.*)```"
        # 定义一个正则表达式模式。
        # ````python`:匹配字面字符串 "```python"。
        # `(.*)`:捕获组,匹配任意字符(`.`)0次或多次(`*`)。
        # `re.DOTALL` 标志使得 `.` 可以匹配包括换行符在内的所有字符。
        # ````:匹配字面字符串 "```"。
        # 目标是匹配并捕获 ````python` 和 ```` 之间的所有内容。

        match = re.search(pattern, rsp, re.DOTALL)
        # 使用 `re.search` 在LLM的响应 `rsp` 中查找匹配 `pattern` 的第一个位置。
        # `re.DOTALL` 确保 `.` 能匹配换行符,以便捕获多行代码。

        code_text = match.group(1) if match else rsp
        return code_text
定义角色
在 MetaGPT 中,Role 类是智能体的逻辑抽象。一个 Role 能执行特定的 Action,拥有记忆、思考并采用各种策略行动。基本上,它充当一个将所有这些组件联系在一起的凝聚实体。
在这个示例中,r嗯创建了一个 SimpleCoder,它能够根据人类的自然语言描述编写代码。步骤如下:
- 我们为其指定一个名称和配置文件。
- 我们使用
self._init_action函数为其配备期望的动作SimpleWriteCode。 - 我们覆盖
_act函数,其中包含智能体具体行动逻辑。我们写入,我们的智能体将从最新的记忆中获取人类指令,运行配备的动作,MetaGPT将其作为待办事项 (self.rc.todo) 在幕后处理,最后返回一个完整的消息。
from metagpt.roles import Role

class SimpleCoder(Role):
    name: str = "Alice"
    profile: str = "SimpleCoder"

    def __init__(self, **kwargs):
        super().__init__(**kwargs)
        self.set_actions([SimpleWriteCode])

    async def _act(self) -> Message:
        logger.info(f"{self._setting}: to do {self.rc.todo}({self.rc.todo.name})")
        todo = self.rc.todo  # todo will be SimpleWriteCode()

        msg = self.get_memories(k=1)[0]  # find the most recent messages
        code_text = await todo.run(msg.content)
        msg = Message(content=code_text, role=self.profile, cause_by=type(todo))

        return msg
运行你的角色
现在我们可以让我们的智能体开始工作,只需初始化它并使用一个起始消息运行它。
import asyncio

from metagpt.context import Context

async def main():
    msg = "write a function that calculates the sum of a list"
    context = Context()
    role = SimpleCoder(context=context)
    logger.info(msg)
    result = await role.run(msg)
    logger.info(result)

asyncio.run(main)
具有多个动作的智能体
智能体的力量,或者说Role抽象的惊人之处,在于动作的组合(以及其他组件,比如记忆,但我们将把它们留到后面的部分)。通过连接动作,我们可以构建一个工作流程,使智能体能够完成更复杂的任务。
假设现在我们不仅希望用自然语言编写代码,而且还希望生成的代码立即执行。一个拥有多个动作的智能体可以满足我们的需求。让我们称之为RunnableCoder,一个既写代码又立即运行的Role。我们需要两个Action:SimpleWriteCode 和 SimpleRunCode
定义动作
首先,定义 SimpleWriteCode。我们将重用上面创建的那个。
接下来,定义 SimpleRunCode。如前所述,从概念上讲,一个动作可以利用LLM,也可以在没有LLM的情况下运行。在SimpleRunCode的情况下,LLM不涉及其中。我们只需启动一个子进程来运行代码并获取结果。我们希望展示的是,对于动作逻辑的结构,我们没有设定任何限制,用户可以根据需要完全灵活地设计逻辑。
class SimpleRunCode(Action):
    name: str = "SimpleRunCode"

    async def run(self, code_text: str):
        result = subprocess.run(["python3", "-c", code_text], capture_output=True, text=True)
        code_result = result.stdout
        logger.info(f"{code_result=}")
        return code_result
定义角色
与定义单一动作的智能体没有太大不同!让我们来映射一下:
用
self.set_actions初始化所有Action指定每次
Role会选择哪个Action。我们将react_mode设置为 “by_order”,这意味着Role将按照self.set_actions中指定的顺序执行其能够执行的Action(有关更多讨论,请参见 思考和行动)。在这种情况下,当Role执行_act时,self.rc.todo将首先是SimpleWriteCode,然后是SimpleRunCode。标准ReAct模式(默认)
先思考,再行动,直到角色认为是时候停止。这是ReAct论文中的标准思考-行动循环,即交替进行任务解决中的思考和行动,即
_think->_act->_think->_act-> …每次在
_think期间,Role将选择一个Action来响应当前的观察,并在_act阶段运行所选的Action。然后,操作输出将成为下一步在_think中再次使用的新观察。我们在_think中动态地使用LLM来选择动作,这使得该模式具有良好的通用性。按顺序执行
每次按照\set_actions中定义的顺序执行可行的操作,即
_act(Action1) ->_act(Action2) ->_act(Action3) -> …这种模式适合于确定性的标准操作程序(SOP),在这种情况下我们确切地知道
Role应该采取什么行动以及它们的顺序。使用这种模式,你只需要定义Action,框架将接管管道构建。覆盖
_act函数。Role从上一轮的人类输入或动作输出中检索消息,用适当的Message内容提供当前的Action(self.rc.todo),最后返回由当前Action输出组成的Message。
class RunnableCoder(Role):
    name: str = "Alice"
    profile: str = "RunnableCoder"

    def __init__(self, **kwargs):
        super().__init__(**kwargs)
        self.set_actions([SimpleWriteCode, SimpleRunCode])
        self._set_react_mode(react_mode="by_order")

    async def _act(self) -> Message:
        logger.info(f"{self._setting}: to do {self.rc.todo}({self.rc.todo.name})")
        # By choosing the Action by order under the hood
        # todo will be first SimpleWriteCode() then SimpleRunCode()
        todo = self.rc.todo

        msg = self.get_memories(k=1)[0]  # find the most k recent messages
        result = await todo.run(msg.content)

        msg = Message(content=result, role=self.profile, cause_by=type(todo))
        self.rc.memory.add(msg)
        return msg
运行你的角色
现在可以让你的智能体开始工作,只需初始化它并使用一个起始消息运行它。
import asyncio

from metagpt.context import Context

async def main():
    msg = "write a function that calculates the sum of a list"
    context = Context()
    role = RunnableCoder(context=context)
    logger.info(msg)
    result = await role.run(msg)
    logger.info(result)

asyncio.run(main)
使用记忆
记忆是智能体的核心组件之一。智能体需要记忆来获取做出决策或执行动作所需的基本上下文,还需要记忆来学习技能或积累经验。
1.理解MetaGPT中记忆的概念
2.如何添加或检索记忆
什么是记忆
在MetaGPT中,Memory类是智能体的记忆的抽象。当初始化时,Role初始化一个Memory对象作为self.rc.memory属性,它将在之后的_observe中存储每个Message,以便后续的检索。简而言之,Role的记忆是一个含有Message的列表。
检索记忆
当需要获取记忆时(获取LLM输入的上下文),你可以使用self.get_memories。函数定义如下:
def get_memories(self, k=0) -> list[Message]:
    """A wrapper to return the most recent k memories of this role, return all when k=0"""
    return self.rc.memory.get(k=k)
async def _act(self) -> Message:
        logger.info(f"{self._setting}: ready to {self.rc.todo}")
        todo = self.rc.todo

        # context = self.get_memories(k=1)[0].content # use the most recent memory as context
        context = self.get_memories() # use all memories as context

        code_text = await todo.run(context, k=5) # specify arguments

        msg = Message(content=code_text, role=self.profile, cause_by=todo)

        return msg
添加记忆
可以使用self.rc.memory.add(msg)添加记忆,,其中msg必须是Message的实例。请查看上述的代码片段以获取示例用法。
建议在定义_act逻辑时将Message的动作输出添加到Role的记忆中。通常,Role需要记住它先前说过或做过什么,以便采取下一步的行动。
创建和使用工具
在 MetaGPT 中创建工具是一个直接的过程,涉及创建自己的函数或类,并将它们放在 metagpt/tools/libs 目录下。
创建工具的步骤
创建预提供的函数或类:
编写专门用于与外部环境进行特定交互的函数或类,并将它们放置在
metagpt/tools/libs目录中。使用谷歌风格的文档字符串(Docstring):
为每个函数或类配备谷歌风格的文档字符串。这作为一个简洁而全面的参考资料,详细说明其用途、输入参数和预期输出。
应用@register_tool装饰器:
使用
@register_tool装饰器以确保在工具注册表中准确注册。这个装饰器简化了函数或类与DataInterpreter的集成。
自定义计算阶乘的工具
在
metagpt/tools/libs中创建一个你自己的函数,假设它是calculate_factorial.py,并添加装饰器@register_tool以将其注册为工具# metagpt/tools/libs/calculate_factorial.py import math from metagpt.tools.tool_registry import register_tool # 使用装饰器注册工具 @register_tool() def calculate_factorial(n): """ 计算非负整数的阶乘 """ if n < 0: raise ValueError("输入必须是非负整数") return math.factorial(n)在数据解释器
DataInterpreter中使用工具# main.py import asyncio from metagpt.roles.di.data_interpreter import DataInterpreter from metagpt.tools.libs import calculate_factorial async def main(requirement: str): role = DataInterpreter(tools=["calculate_factorial"]) # 集成工具 await role.run(requirement) if __name__ == "__main__": requirement = "请计算 5 的阶乘" asyncio.run(main(requirement))
注意:
- 别忘了为你的函数编写文档字符串(docstring),这将有助于
DataInterpreter选择合适的工具并理解其工作方式。 - 在注册工具时,工具的名称就是函数的名称。
- 在运行 DataInterpreter 之前,记得从
metagpt.tools.libs导入你的calculate_factorial模块,以确保该工具已被注册。
人类介入
在一些实际情境中,我们确实希望人类介入,无论是为了项目的质量保证,在关键决策中提供指导,还是在游戏中扮演角色。
在LLM和人类之间切换
最初,LLM扮演 SimpleReviewer 的角色。假设我们想对更好地控制审阅过程,我们可以亲自担任这个Role。这只需要一个开关:在初始化时设置 is_human=True。代码变为:
team.hire(
    [
        SimpleCoder(),
        SimpleTester(),
        # SimpleReviewer(), # 原始行
        SimpleReviewer(is_human=True), # 更改为这一行
    ]
)
我们作为人类充当 SimpleReviewer,现在与两个基于LLM的智能体 SimpleCoder 和 SimpleTester 进行交互。我们可以对SimpleTester写的单元测试进行评论,比如要求测试更多边界情况,让SimpleTester进行改写。这个切换对于原始的SOP和 Role 定义是完全不可见的(无影响),这意味着可以应用于任何场景。
每次轮到我们回应时,运行过程将暂停并等待我们的输入。只需输入我们想要输入的内容,然后就将消息发送给其他智能体了!
集成开源LLM
由于上述部署为API接口,因此通过修改配置文件config/config2.yaml进行生效。
openai兼容接口
如 LLaMA-Factory、FastChat、vllm部署的openai兼容接口
config/config2.yaml
llm:
  api_type: open_llm
  base_url: 'http://106.75.10.xxx:8000/v1'
  model: 'llama2-13b'
ollama api接口
如通过ollama部署的模型服务
config/config2.yaml
llm:
  api_type: ollama
  base_url: 'http://127.0.0.1:11434/api'
  model: 'llama2'
ollama chat接口的完整路由http://127.0.0.1:11434/api/chat ,base_url 只需要配置到http://127.0.0.1:11434/api ,剩余部分由OllamaLLM 补齐。model 为请求接口参数model 的实际值。
为角色或动作配置不同LLM
MetaGPT允许为团队中的不同Role和Action使用不同的LLM,这极大地增强了团队互动的灵活性和现实性,使得每个Role可以根据其特定的需求和背景,以及每个Action的特点,选择最合适的LLM。通过这种方式,可以更精细地控制对话的质量和方向,从而创造出更加丰富和真实的交互体验。
以下是设置步骤:
- 定义配置:使用默认配置,或者从
~/.metagpt目录中加载自定义配置。 - 分配配置:将特定的LLM配置分配给Role和Action。配置的优先级:Action config > Role config > Global config(config in config2.yaml)。
- 团队交互:创建一个带有环境的团队,开始交互。
示例
考虑一个美国大选的现场直播环境,创建三个Role:A、B和C。A和B是两个候选人,C是一个选民。
定义配置
可以使用默认配置,为不同的Role和Action配置LLM,也可以在~/.metagpt目录中加载自定义配置。
from metagpt.config2 import Config

# 以下是一些示例配置,分别为gpt-4、gpt-4-turbo 和 gpt-3.5-turbo。
gpt4 = Config.from_home("gpt-4.yaml")  # 从`~/.metagpt`目录加载自定义配置`gpt-4.yaml`
gpt4t = Config.default()  # 使用默认配置,即`config2.yaml`文件中的配置,此处`config2.yaml`文件中的model为"gpt-4-turbo"
gpt35 = Config.default()
gpt35.llm.model = "gpt-3.5-turbo"  # 将model修改为"gpt-3.5-turbo"
分配配置
创建Role和Action,并为其分配配置。
from metagpt.roles import Role
from metagpt.actions import Action

# 创建a1、a2和a3三个Action。并为a1指定`gpt4t`的配置。
a1 = Action(config=gpt4t, name="Say", instruction="Say your opinion with emotion and don't repeat it")
a2 = Action(name="Say", instruction="Say your opinion with emotion and don't repeat it")
a3 = Action(name="Vote", instruction="Vote for the candidate, and say why you vote for him/her")

# 创建A,B,C三个角色,分别为“民主党候选人”、“共和党候选人”和“选民”。
# 虽然A设置了config为gpt4,但因为a1已经配置了Action config,所以A将使用model为gpt4的配置,而a1将使用model为gpt4t的配置。
A = Role(name="A", profile="Democratic candidate", goal="Win the election", actions=[a1], watch=[a2], config=gpt4)
# 因为B设置了config为gpt35,而为a2未设置Action config,所以B和a2将使用Role config,即model为gpt35的配置。
B = Role(name="B", profile="Republican candidate", goal="Win the election", actions=[a2], watch=[a1], config=gpt35)
# 因为C未设置config,而a3也未设置config,所以C和a3将使用Global config,即model为gpt4的配置。
C = Role(name="C", profile="Voter", goal="Vote for the candidate", actions=[a3], watch=[a1, a2])
请注意,对于关注的Action而言,配置的优先级为:Action config > Role config > Global config 。不同Role和Action的配置情况如下:
Action和角色的撕裂
| Action of interest | Global config | Role config | Action config | Effective config for the Action |
|---|---|---|---|---|
| a1 | gpt4 | gpt4 | gpt4t | gpt4t |
| a2 | gpt4 | gpt35 | unspecified | gpt35 |
| a3 | gpt4 | unspecified | unspecified | gpt4 |
团队交互
创建一个带有环境的团队,并使其进行交互。
import asyncio
from metagpt.environment import Environment
from metagpt.team import Team

# 创建一个描述为“美国大选现场直播”的环境
env = Environment(desc="US election live broadcast")
team = Team(investment=10.0, env=env, roles=[A, B, C])
# 运行团队,我们应该会看到它们之间的协作
asyncio.run(team.run(idea="Topic: climate change. Under 80 words per message.", send_to="A", n_round=3))
# await team.run(idea="Topic: climate change. Under 80 words per message.", send_to="A", n_round=3) # 如果在Jupyter Notebook中运行,使用这行代码
完整代码和对应配置示例
默认配置: ~/.metagpt/config2.yaml
llm:
  api_type: 'openai'
  model: 'gpt-4-turbo'
  base_url: 'https://api.openai.com/v1'
  api_key: 'sk-...' # YOUR_API_KEY
自定义配置: ~/.metagpt/gpt-4.yaml
llm:
  api_type: 'openai'
  model: 'gpt-4o'
  base_url: 'https://api.openai.com/v1'
  api_key: 'sk-...' # YOUR_API_KEY
python
from metagpt.config2 import Config
from metagpt.roles import Role
from metagpt.actions import Action
import asyncio
from metagpt.environment import Environment
from metagpt.team import Team

# 以下是一些示例配置,分别为gpt-4、gpt-4-turbo 和 gpt-3.5-turbo。
gpt4 = Config.from_home("gpt-4.yaml")  # 从`~/.metagpt`目录加载自定义配置`gpt-4.yaml`
gpt4t = Config.default()  # 使用默认配置,即`config2.yaml`文件中的配置,此处`config2.yaml`文件中的model为"gpt-4-turbo"
gpt35 = Config.default()
gpt35.llm.model = "gpt-3.5-turbo"  # 将model修改为"gpt-3.5-turbo"

# 创建a1、a2和a3三个Action。并为a1指定`gpt4t`的配置。
a1 = Action(config=gpt4t, name="Say", instruction="Say your opinion with emotion and don't repeat it")
a2 = Action(name="Say", instruction="Say your opinion with emotion and don't repeat it")
a3 = Action(name="Vote", instruction="Vote for the candidate, and say why you vote for him/her")

# 创建A,B,C三个角色,分别为“民主党候选人”、“共和党候选人”和“选民”。
# 虽然A设置了config为gpt4,但因为a1已经配置了Action config,所以A将使用model为gpt4的配置,而a1将使用model为gpt4t的配置。
A = Role(name="A", profile="Democratic candidate", goal="Win the election", actions=[a1], watch=[a2], config=gpt4)
# 因为B设置了config为gpt35,而为a2未设置Action config,所以B和a2将使用Role config,即model为gpt35的配置。
B = Role(name="B", profile="Republican candidate", goal="Win the election", actions=[a2], watch=[a1], config=gpt35)
# 因为C未设置config,而a3也未设置config,所以C和a3将使用Global config,即model为gpt4的配置。
C = Role(name="C", profile="Voter", goal="Vote for the candidate", actions=[a3], watch=[a1, a2])

# 创建一个描述为“美国大选现场直播”的环境
env = Environment(desc="US election live broadcast")
team = Team(investment=10.0, env=env, roles=[A, B, C])
# 运行团队,我们应该会看到它们之间的协作
asyncio.run(team.run(idea="Topic: climate change. Under 80 words per message.", send_to="A", n_round=3))
# await team.run(idea="Topic: climate change. Under 80 words per message.", send_to="A", n_round=3) # 如果在Jupyter Notebook中运行,使用这行代码